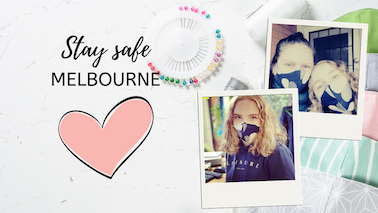
• Skip to content
  • Skip to primary sidebar

Thread Den

Learn to Sew Melbourne

  • Workshops
    • Sewing Basics For Beginners Course
    • Sewing Workshop Categories
      • All Workshops
      • New
      • Sewing
        • Workshops by Skill Level
          • Level 1 Workshops
          • Level 2 Workshops
          • Level 3 Workshops
        • New Workshops
        • Garment Type
          • Tops
          • Coats
          • Dresses
          • Skirts
          • Pants
          • Underwear
          • Accessories
        • Knit Fabrics
        • Woven Fabrics
        • Men’s
        • Craft/Other
    • Pattern Drafting
    • Crochet Workshops
    • Machine & Hand Knitting Workshops
    • Kids Holiday Sewing
    • Vintage Hair & Makeup Workshops
    • Private Lessons
      • Private Parties
  • About
    • Directions & Map
    • Email or Visit Us
    • Membership
    • COVIDSafe Plan
    • Onsite machine hire
    • Blog
    • Terms and Conditions
    • Mailing List Sign Up
    • Private Parties
  • Gift Vouchers
  • Online Store
  • Fabric stores in Melbourne

Search

Sewing Journal

Creating A High-Quality Sewing Space – step 2

29 January 2020 by Danielle Leave a Comment

Written by: Justin Lawrence

Do you want to create the perfect sewing room?

This is the second of eight steps.

2. Focus on the Lighting

The lighting has to be good enough for you to enjoy sewing and see everything in front of you. You want a sewing machine to be highlighted under the light, which can be combined with a separate floor lamp for maximum efficiency. This can make it easier for you while sewing.

Light on sewing machine

You can play around with the lamps and place them in strategic spots to gain full vision.

You can also upgrade the bulb in your sewing machine to a LED bright light bulb. They use less power and provide a brighter whiter light.

On Friday pop back when we’ll focus on organising.

Filed Under: Creating your sewing space

Creating A High-Quality Sewing Space – step 1

26 January 2020 by Danielle Leave a Comment

Written by: Justin Lawrence

Do you want to create the perfect sewing room?

A lot of people assume it requires quite a bit of money to build a high-grade sewing room. However, this isn’t the case and sometimes even with a smaller budget, it’s possible to create an impressive sewing room worthy of praise.

In eight steps, this series is going to illustrate what’s required to make sure you create a beautiful sewing room that is going to allow you to sew without trouble.

Even something small is good enough when put together the right way.

If you’re ready to create a creative and inspiring sewing space, here’s what you need to do.

Are you ready to become a master crafter? Find out about affordable (and fun) sewing lessons today!

Creating a quality sewing room

1. Plan the Layout

When it comes to sewing, you want to understand what’s required and how you’re going to remain efficient during the process. It’s not easy to think about everything, even if you are in love with sewing.

You have to plan out the details including the ironing board, sewing desk, cutting table, and how all of these items work together to create the perfect layout for your space.

The ironing board is a good place to begin as it should be put in front of a window. The reason for this is simple, you don’t want the room heating up during the warmer months because the iron isn’t being aired out.

The amount of condensation created can be quite surprising.

Ironing in front of window

The iron is going to make things intolerable, which is why a window should be nearby, so you can let in the cool breeze from time to time. It’s also nice to iron with a window in front of you.

At Thread Den, we put our ironing boards on top of shelving to maximise space and provide a nifty storage spot. 

If the sewing room is being put in the kitchen or dining room then it’s important to have the right storage space. Something like a bench with internal storage options should go a long way to get the job done.

On Wednesday pop back when we’ll focus on lighting.

Filed Under: Creating your sewing space

Sewing for Bush Fire Impacted Animals

6 January 2020 by Danielle 13 Comments

 
If you need a sewing machine, scissors and equipment to make the requested items you can attend our Open Studio Hours (please rsvp to indicate you are coming in) on Thursday and Friday from 2-6pm throughout January and February (this is usually a benefit for our paid members). We can supply threads and equipment, but we do not have a stash of the approved fabrics.
 
Sydney Wildlife Rescue Photo
 
Click here for patterns for bushfire pouches.
 

Appropriate fabrics are 100% natural fibres, no synthetics or polyesters, no glitter or metallic prints. Breathability and softness is essential. Consider going through your linen cupboard for old natural fibre sheets. 

Liners should be 100% natural fibres: cotton, bamboo, linen – blends and styles of these are OK but no polyester, synthetics or fabrics that have plastic or glitter. Any print is fine! Breathability and softness are the priority: think about what you would put next to a baby’s bare skin. Wool cannot be used for a pouch liner.

Update 12 January:

We have some people question if we should still go ahead with our sewing sessions for bushfire impacted animals. Some collection points have asked people to stop sending items due to rescue organisations advising they are currently at capacity with these items.
Given we are still two months away from the end of the fire season, we think it is worthwhile to still make items. We have three Mondays, the last being Australia Day and we can send items after that (or earlier if the situation changes).  

Many of these animals will need to be in care for quite sometime and while the first wave of need maybe catered for, I feel that there will be need later on when the fires are not still fresh in our mind. 

If you want to still join us, we’d love to have you!

regards

Danielle
Thread Den


Filed Under: Events

Threading your needle

3 December 2019 by Danielle Leave a Comment

Quick tip:

Make it easier to thread your machine needle; snip your thread on an angle to give it a point and always ensure your needle is in its highest position as you thread it. Before you know it, your fingers will remember exactly where to go. 

Filed Under: Sewing Tips

Order of Garment Construction

22 October 2019 by Danielle Leave a Comment

Lost your sewing instructions? If you don’t have the instructions, there is a general order of construction for garments;

Download this 

Filed Under: Printables, Sewing Tips Tagged With: sewing tips

How to Copy a Garment You Love

27 August 2019 by Danielle Leave a Comment

Yifen modeling her joyful new dress
Yifen’s joyful new dress

Yifen recently took part in one of the most popular short courses we offer – the two day course: How to Copy a Garment You Love.  

Over a total of 12 hours; students learn how to assess their original garment to draft a pattern off it – without having to pull the original garment apart! The second component of the course is having students make a toile of their pattern so that we can test the pattern that has been created and make any adjustments or corrections to pattern.  This short course is a great introduction to pattern drafting.

Original dress

In the August 2019 course, Yifen copied a fun party dress that featured angled seams, ruffles and gathering (no easy feat for the copying process) and we are so proud of her results!  Yifen only learnt to sew this year in our Sewing Basics for Beginners 3 Week Course. She has achieved an amazing result with her copied dress – we love it more than the original! Plus she now has a pattern for her favourite dress and can create many different versions. We hope they all bring her as much joy as the fabulous zig zag version.

Filed Under: Made in Class, Sew-inspiring, Workshops

Old fashioned or necessary: Hang the garment?

16 August 2019 by Danielle Leave a Comment

Have you ever come across the instruction “hang the garment for 24 hours”. It may seem unnecessary or even a bit of an old fashioned wive’s tale. But this instruction is necessary and has a purpose. 


A circle skirt covers all the angles of the fabric, think of the skirt hanging on your body – at the front the grain line hangs vertically, on your hips the cross grain hangs vertically, in between the bias is hanging vertically.


If you pull on the angles of your fabric you would find there is very little give along the grain line, there is some give along the cross grain, and there is loads of give or stretch along the bias. Once hanging the bias will stretch and this makes the hem drop more at the bias angles. By hanging your garment, you allow the dropping to occur before hemming.


Make a circle skirt in our class and learn all about the bias and handling the fabric, inserting an invisible zip, attaching a waistband and how to narrow hem all that fabric! Make a Circle Skirt at Thread Den.


Image from Melly Sews

Filed Under: Sewing Tips, Workshops

Why make your own knickers?

22 July 2019 by Danielle Leave a Comment

Do less washing, make more undies

You’ll feel fab!

Imagine if you chose fabric to match your favourite bras and made a couple of pairs of complimentary knickers for each one. You could be rocking a matching set every day of the week… Imagine it! So posh!

You could have the nicest knickers on the line. Totally make the housemates and neighbours jealous.

Save $$$

Thought of how much money you could save by buying a metre or so of fabric, a few metres of lingerie elastic and making up a few pairs?

Or recycling an old t shirt into some undies? That awesome band name that you love could be placed proudly across your bum! 

Be comfortable

We’ve updated this workshop format so that you can bring along other underwear patterns to make in class! Chose the style you like the most.

In the class description we have recommend several great beginner patterns.

PLUS – We’ll be running a seperate class for men’s boxer briefs as they are quite different. So the boys won’t miss out – and if you love wearing the boy’s, this will be the class for you (coming soon).

Read the full class description – click here.

Filed Under: Workshops

We are Crushing on Katie Jones!

11 July 2019 by Danielle Leave a Comment

It is here! Our next Crochet Club. 

We want to introduce you to the crochet designers that you should be crushing hard on. 

In this fortnightly club, you will learn how to make the Katie Jones Flower Poncho with Amy.

[Read more…] about We are Crushing on Katie Jones!

Filed Under: Crochet, Events, Workshops

Fabric Identification

27 June 2019 by Danielle Leave a Comment

Our in-house Fabricophile: Meagan has created a 2 hour workshop where participants learn how to identify what is in their fabric stash.

Covering a bit of fabric history, production and environmental impacts to build a good basis of understanding. You will start to build your own fabric identification resource. The let’s get to know fabrics: wovens, non-woven and knits, how they are made and the most common weave structures. Learn how to work out has it been made from synthetic fibres or natural? Take your fabric knowledge to the next level and discover what to look for when conducting a burn test.

Filed Under: Workshops

  • « Previous Page
  • Page 1
  • …
  • Page 3
  • Page 4
  • Page 5
  • Page 6
  • Page 7
  • …
  • Page 10
  • Next Page »

Primary Sidebar

Socials…

Youtube
Pinterest
Pinterest
fb-share-icon
Instagram

Quick links

  • Sewing Basics for Beginners
  • FreeStyle Sessions
  • Gift Vouchers
  • Theory Sessions
  • Upcoming School Holiday Sewing
  • Pattern Drafting
  • Private Lessons
  • All Workshops
  • Mailing List Sign Up
  • Our Teachers
  • Workshop Skill Levels Explained
    • Level 1 Workshops
    • Level 2 Workshops
    • Level 3 Workshops
  • Blog

Copyright © 2023 · Infinity Pro on Genesis Framework · WordPress · Log in